
Stage one – preparation
The problems of the removal were manifold. The primary problem was the fact that the work was a plaster construction applied directly to a dry-stone wall that stood against an earthen bank.
The nature of its construction meant that the wall could not be taken apart and reassembled at its new site, it could only be moved in one piece. It was decided that the best way of doing this would be to secure the stones of the wall in concrete before attempting to move it.
As anyone familiar with the construction of the Lakeland type of dry-slate wall will know, it is in fact a double wall, the two sides leaning slightly inwards, with a filling of rubble in between. At intervals there are courses of “throughs”, long stones tying together the inside and outside leaves. So in order to embed in concrete the stones that support the plaster on the inside face, it was necessary to remove the outer leaf of the wall and dig out all the rubble filling. A perilous operation.
First of all the bank behind the wall was dug out, so that work could begin on securing the stones. The whole job was supported continuously by wooden shoring inside the barn and “Acrow” expanding props outside.These props are easily portable and enabled us to apply support to the outside exactly where it was needed as the job progressed.
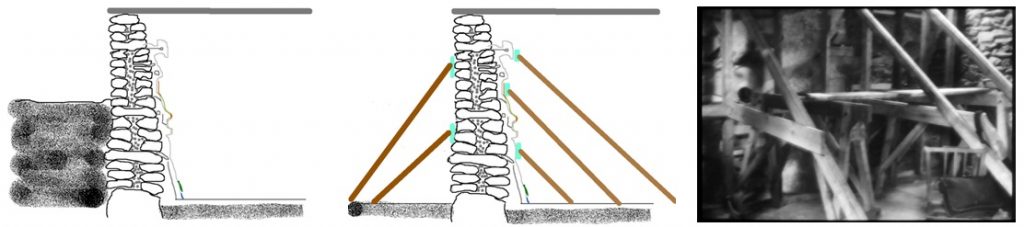
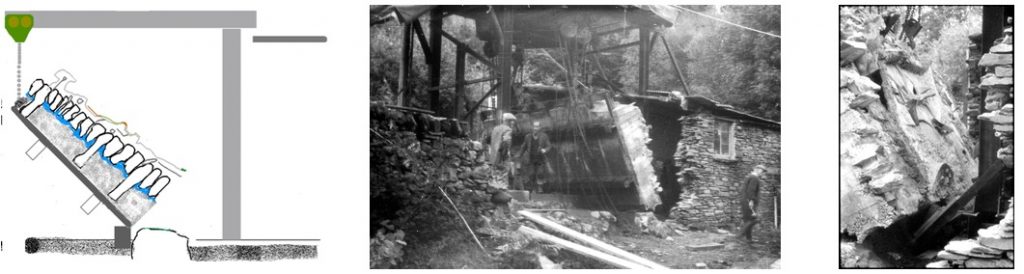
- Cross-section of Merzbarn in situ, earth bank behind double-leaf drystone wall, rubble infill, intermittent through stones, plasterwork on interior wall.
- Earth bank dug away. Internal timber shoring in place, cushioned with foam blocks. Acrow props outside.
- Timber shoring inside the barn to support the wall while work is under way on the outside.
Working in sections about two feet square at a time, the outer wall and the rubble filling were removed, and the exposed backs of the stones of the inner wall grouted with a strong mortar. Each section treated this way was then left for several days to set while work continued on another part of the wall. The wall which was eventually moved measured about thirteen feet by nine, and this initial stage took about a month to complete.
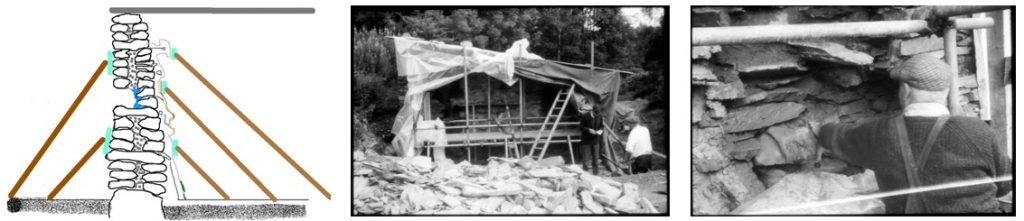
- Process of removing outer leaf of stones begins, removing rubble, grouting exposed backs of inner leaf stones.
- Removing the outer leaf of the wall progressively in sections
- Ted, Laing’s foreman on the project, at work grouting the back of the stones of the inside wall
Our problems were complicated by the fact that the wall, though relatively recent (it was put up in 1943) stood on old foundations. These consisted of large boulders set deep into the ground. They were judged too large to be moved safely with the rest of the wall and so a division was made to clear the tops of them. This meant losing the lower twelve or fourteen inches of the inside face, which, fortunately, contained no features which could not fairly readily be replaced. Furthermore, on the North side the barn was built in to the hillside, and this necessitated leaving behind the right-hand end of the wall about two feet from the corner. This part of the mural had been left in a very unfinished state at Schwitters’ death and had been subsequently worked on by Mr. Pierce and his associate Jack Cook, to help make it more permanent.
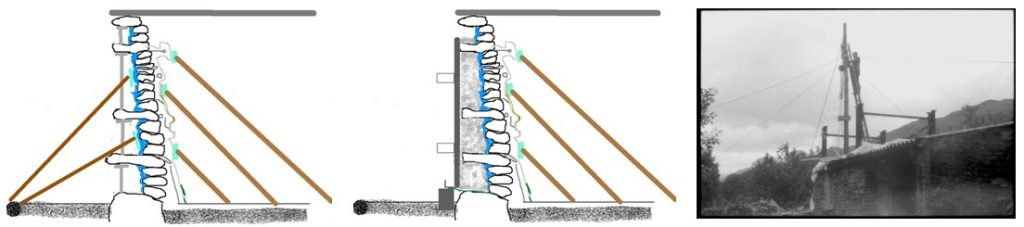
- Outer leaf completely removed, grouting complete, through stones propped
- Through stones cut back, steel frame erected, and shuttered, filled with concrete, sill cast in place at foot of frame
- Tommy Niven up the pole hoisting the gantry into place.
So that it could be moved the wall needed to be in a stable horizontal position. The plan was to tip over onto its back the completed steel and concrete mass with the wall embedded in it. The next stage of the removal was therefore to erect a steel girder frame behind the wall which would be incorporated into the concrete and provide lifting points as well as reinforcement. A concrete sill was built on which the whole thing would eventually heel when it was lowered. The erection of the steel frame was hindered by the presence of the ‘throughs’, several of which intersected with the steel frame or projected beyond it. We realised that these would have to be cut off. The risk of vibration damaging the plaster was very great, as the fabric of the mural was in a very fragile condition.
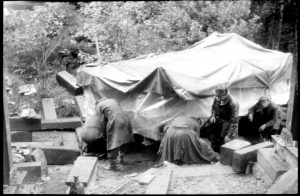
To prevent this as far as possible a fibre grinding disc was used rather than a metal saw. This had a certain degree of flexibility and did not catch and jar as a saw might have done. The stones were cut by Ted, the foreman, successfully and without incident (other than my own blood pressure.) With the steel framework up, it was shuttered and filled with concrete, mixed on site (it was inaccessible for a ready-mix lorry).
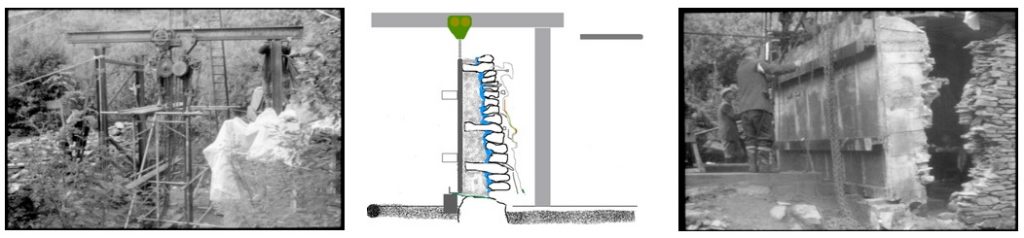
- Lifting gear being hoisted in to place on the gantry
- Roof opened, gantry erected, lifting tackle in place, lower section of plasterwork removed, foundation joint raked out
- The wall stands ready to be moved
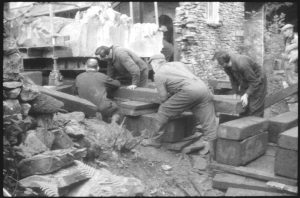
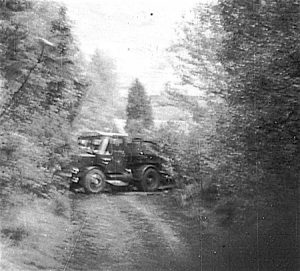
The next stage was to put up a gantry over the site to carry the lifting gear which would be used to lower the wall to the ground. Since the weight had been estimated to be as much as twenty-five tons, this had to be a mighty structure. The terrain posed problems. The barn stood about one hundred and fifty yards from the road and could only be reached up a steep slope and along a grass track with a wall on one side and a ditch on the other. It was impossible to bring up a crane and so all the steelwork had to be manhandled into position with a block and tackle hitched to a pole.
As the job progressed the weather, which had been good, worsened and we had heavy rain during all the vital stages of the removal. After a great deal of heaving and struggling the gantry was up. It must have been twenty feet high and the girders on top carried four huge sets of lifting tackle which were attached to the lugs welded to the top of the steel frame now cradling the wall. A cover of tarpaulins was thrown over the gantry to keep off rain and all was ready. The weight of the wall was taken on the gantry, and the joint at the bottom of the inside face was raked out. Wedges were placed along the bottom of the wall to help prevent it from skidding forwards as the wall was lowered. The lifting tackle was run slowly backwards along the gantry keeping pace with the top of the wall as it went over. Slowly, slowly the mass began to tilt and finally settled onto blocks of wood on the ground.
- Entire block is tilted over to the horizontal ready for removal
- Sid, Tommy and Ted, as the wall tilts (a test run the day before the press were invited)
- For the first tme the wall artwork is exposed to the outside
The preparatory stage was completed.
Stage two – transportation
A frame of scaffolding was erected over the face and covered with polythene sheets and tarpaulins, to try to keep it dry. Pickfords, who were the contractors for the transportation, arrived in pouring rain and found the going too muddy for their lorry, it had to be hauled up by a hand winch to a point where the track levelled out. A road of railway sleepers was laid over the remaining section, and the actual move began.
The process consisted of jacking up the Wall, laying steel plates on blocks of timber underneath it and sliding it on ‘skates’, sets of steel rollers in a frame. The Wall had to be hauled to the pathway, turned through ninety degrees and lowered down a six foot drop before reaching the relatively straightforward track, still in the pouring rain.
-
- Pickford’s team, led by Leo, begin to move the wall out
-
- In pouring rain, the Wall edges towards the pathway to the road
The Laing’s team led by Ted had spent months with the Wall (and with me) and had come to understand the nature of what they were handling. The Pickford’s men, led by Leo, were experts in shifting enormously heavy electricity transformers for substations across fields and wild places. For them this job was another heavy weight to be moved, and I had to begin over again, in a hurry. As the block of concrete with Schwitters’ last work embedded into it began to move, winched along the track towards the pathway, it started to run slightly off line. I saw one of Pickford’s men reach down for a sledgehammer and prepare to give the block a tap to straighten it up. I had to throw myself between him and the Merzbarn, and explain that we were not going to do that. After a short consultation, it was agreed that instead of whacking it, a little hydraulic jack could be used to apply such pushing as was needed.
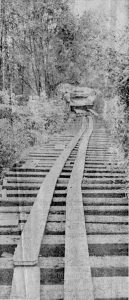
Track of railway sleepers laid from the barn to the lorry
All went well and the wall was winched slowly out and eventually on to the lorry. Driving it out fully laden was a different matter from getting the lorry in, which had been difficult enough. With the Wall on board, on ground soaked by days of rain, as it crept down the pathway towards the road, the lorry began gently to slip sideways down the slope, as the pathway broke up beneath it. I was in front of the lorry and could see the face of the driver. He registered the problem and I saw him take an instant decision. Had he stopped, the whole thing might have slid uncontrollably sideways. He held his nerve, pressed on, brought the load gently round the bend to face downhill to the road, and out.
-
- Pickford’s low-loader, laden with the Merzbarn, comes down the last slope towards the road.
-
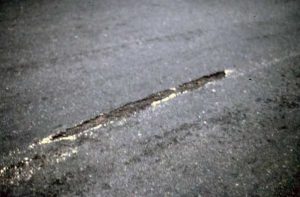
- The loaded lorry cut a deep groove in the humpbacked Clappersgate Bridge as it crept over
One more hazard was to come. At Clappersgate, the road from Elterwater to Ambleside crosses the beck, a sharp right and left turn over a humpbacked bridge. Coming, the low loader had managed to manoeuvre the bends and cleared the bridge. Going, laden, the bottom of the trailer chewed a deep groove in the roadway at the peak of the bridge, but made it over. Mary Burkett, following the lorry, took a picture. From there it was comparatively plain sailing. Getting the wall onto the lorry and out to the road took about a week in all. The lorry with the wall and myself aboard left Cylinders at three o’clock in the afternoon, made an overnight stop in Kendal and on the morning of Monday, 4th October, it arrived at the site in Newcastle.
-
- Pickford’s low-loader, laden with the Merzbarn, comes down the last slope towards the road.
-
- The loaded lorry cut a deep groove in the humpbacked Clappersgate Bridge as it crept over